Invisible Letters
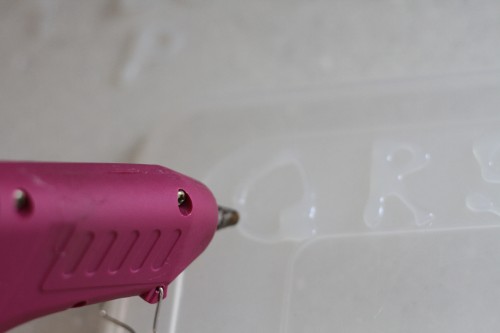
This idea for Invisible Letters was an accident…I was trying to make some sight word stamps (by writing sight words backwards on large lids with a hot glue gun), but that was a complete and total fail. They didn’t work as stamps because the hot glue wasn’t a completely smooth surface, so the ink stuck to some of the hot glue but not other parts. The stamped image was, in turn, unreadable. Here is a glimpse at my attempt…
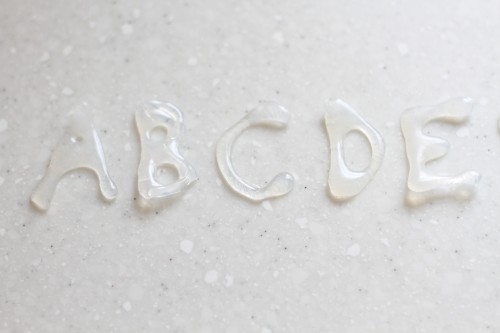
Once I realized this idea had failed, I started to peel the glue off the lids (so I could reuse them for something else, of course). It was then that I recognized that the dried hot glue letters were actually pretty cool all by themselves! :)
Here’s what you’ll need: a hot glue gun and a smooth, heat-proof surface.
1. Use your glue gun to carefully write every letter in the alphabet (capital and lowercase, if you’re really ambitious…we just did capital letters). I used a plastic lid from one of my cake pans as the surface. In hindsight, they were less “invisible” since I used this lid because it had a design that then was transferred onto the bottom of the letters.
2. Let them dry completely. Then use a butter knife to pry the edges off of your flat surface.
Now you see them…
…now you don’t (well, you kind of do…but you get the point). :)
Once you’ve made them, store them in a plastic bag for next time!
There are so many ways you could use these flexible letters…alphabet ordering, crayon rubbings, hidden in a sensory tub, and in letter boxes (just to name a few).
Don’t forget…get my brand new eBook for just $3.99 as a PDF or on your Kindle (or Kindle app)!







This looks like fun, and I just bought a new hot glue gun! It’s been raining for days, so we’ll have to try this today. In college I took a child art class. We made stamps using regular elmer’s glue on cardboard, letting dry, then wrapping in tin foil. Shape the foil to glue for a stamp. They were large (8×10 maybe), but I’m wondering if the same concept would work for your sight words? I’ll have to experiment. ;)
Jenae, I like this idea! I can have my older clients help me make them for the little ones. Good shoulder strengthening and visual motor for the big guys and lots of great ABC fun for the little ones:) Thanks for sharing!
You should definitely do the lower-case letters, but forget about the uppercase letters. Realistically, if a child is learning to read, how often do they see or read upper-case, and how often do they read lower-case? It’s not until later that a child needs to understand upper-case letters.
While you have a valid point when it comes to reading, schools actually teach children to write and recognize all uppercase letters, first. In preschool, children are not expected to write in lowercase at all. This may be due to the fact that there are way more lowercase letters that are curvy and young children, with their less refined motor skills, have an easier time drawing straight lines than curved ones. So for early literacy skills, uppercase letters are actually very important.
So flippin cool! I’m so doing this! What a happy accident :)
{LOVE} your accident!! :) so cool!
I loved this idea so much that I set up two super simple sensory bins using them.
http://andnextcomesl.blogspot.ca/2013/05/two-simple-sensory-bins-using-invisible.html
Why not use your peeled letters and re-glue them onto your caps for a flat bottomed letter? I bet it would work.
That’s a great idea! I’ll have to try it sometime. :)
I love the idea! I’m going to try using it to make playdough stamps (they can stamp with one side, then cut them out with the other to put them in order.). How hard was it to get the letters off?
I think your original stamper idea would work great on play dough, just the way it was.
I just visited your website for the first time and am so glad I did! I’m beginning to ‘homeschool’ my three year old and the alphabet activities on your site are fantastic! I’ll definitely be visiting again! Thanks!
Thanks so much, Amy! I appreciate your kind comment!!
So creative! I would love it if you would share your ideas at my Monday of Many Blessings Link Up!!http://ourhomeofmanyblessings.com/